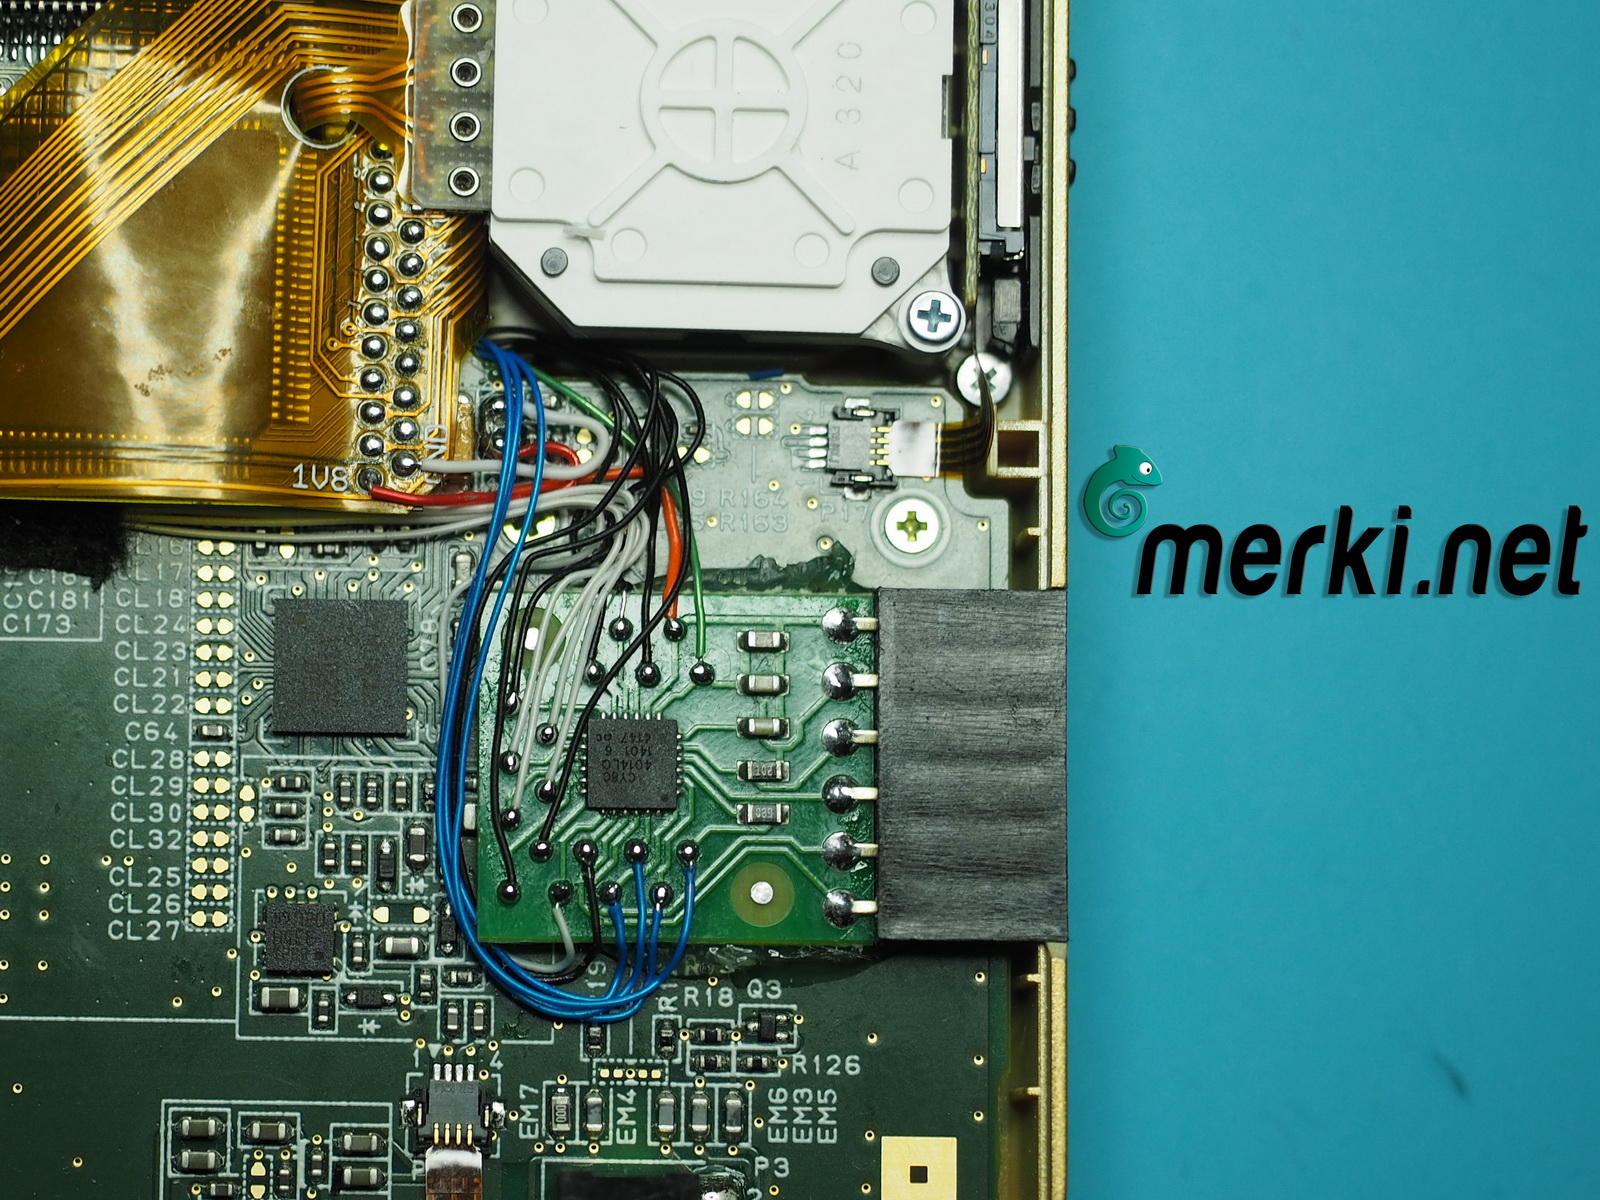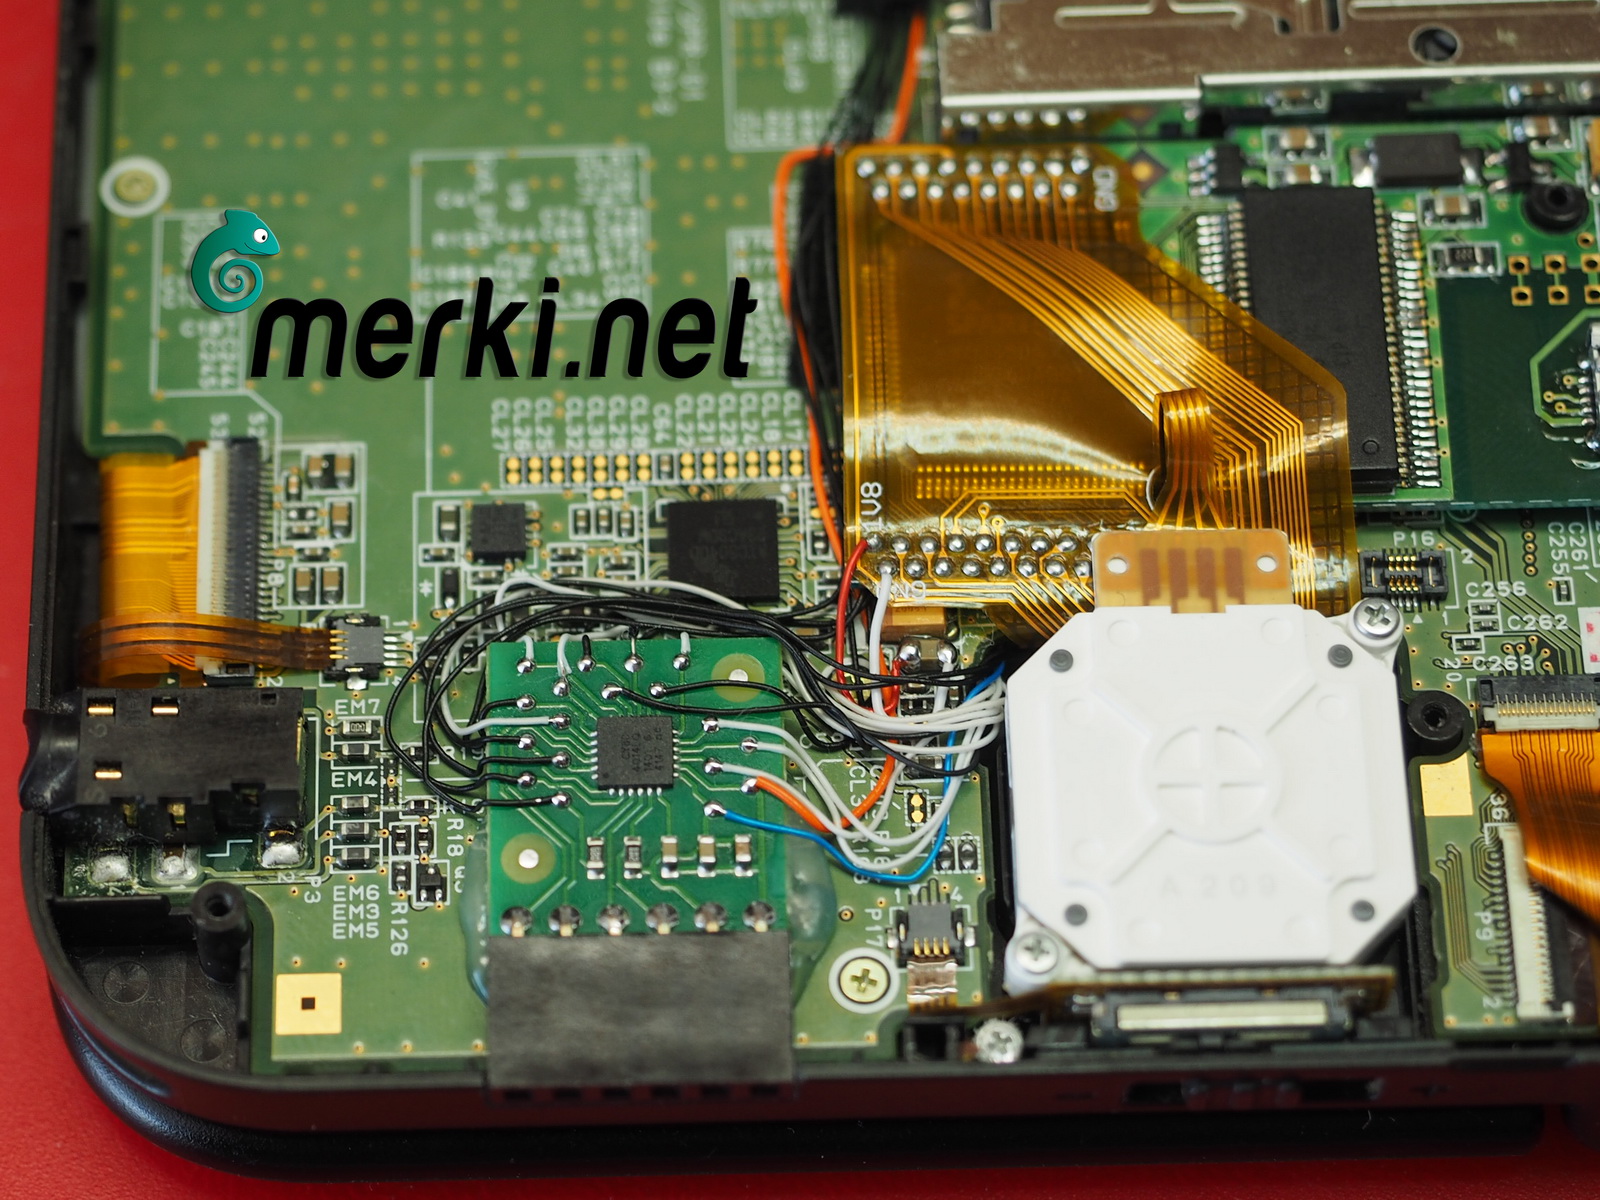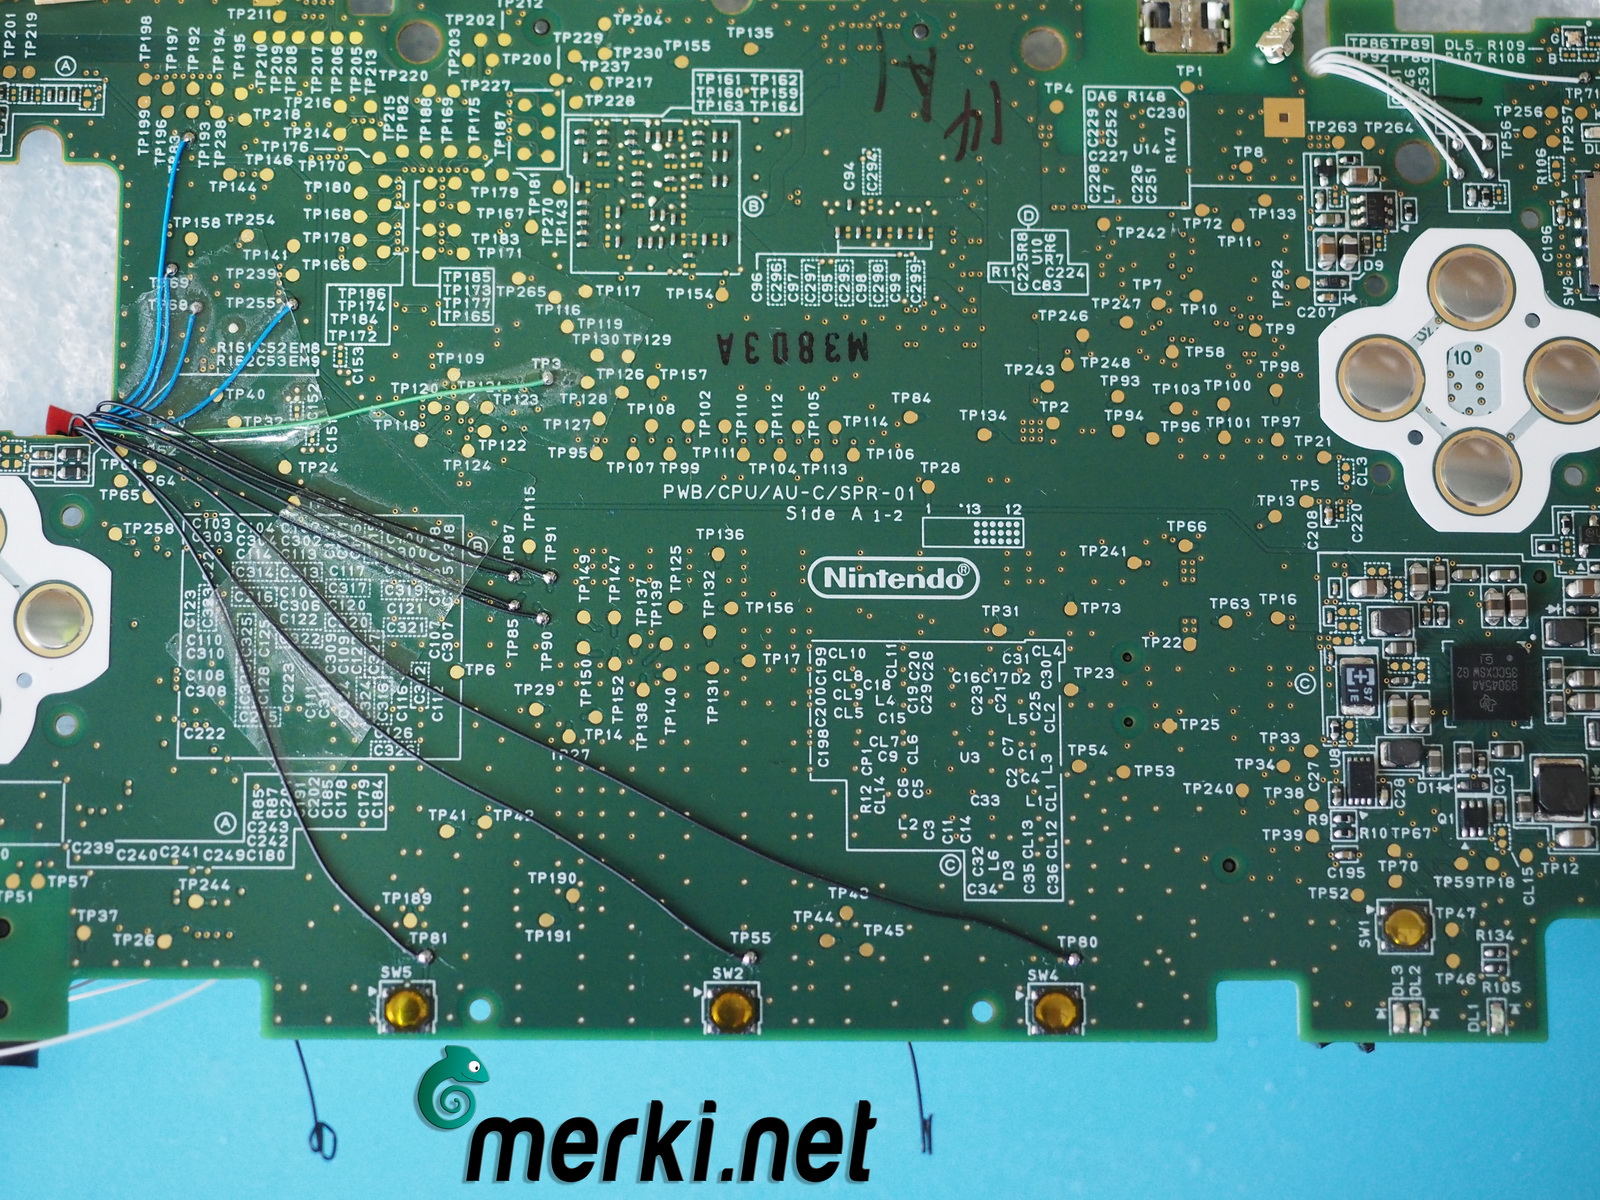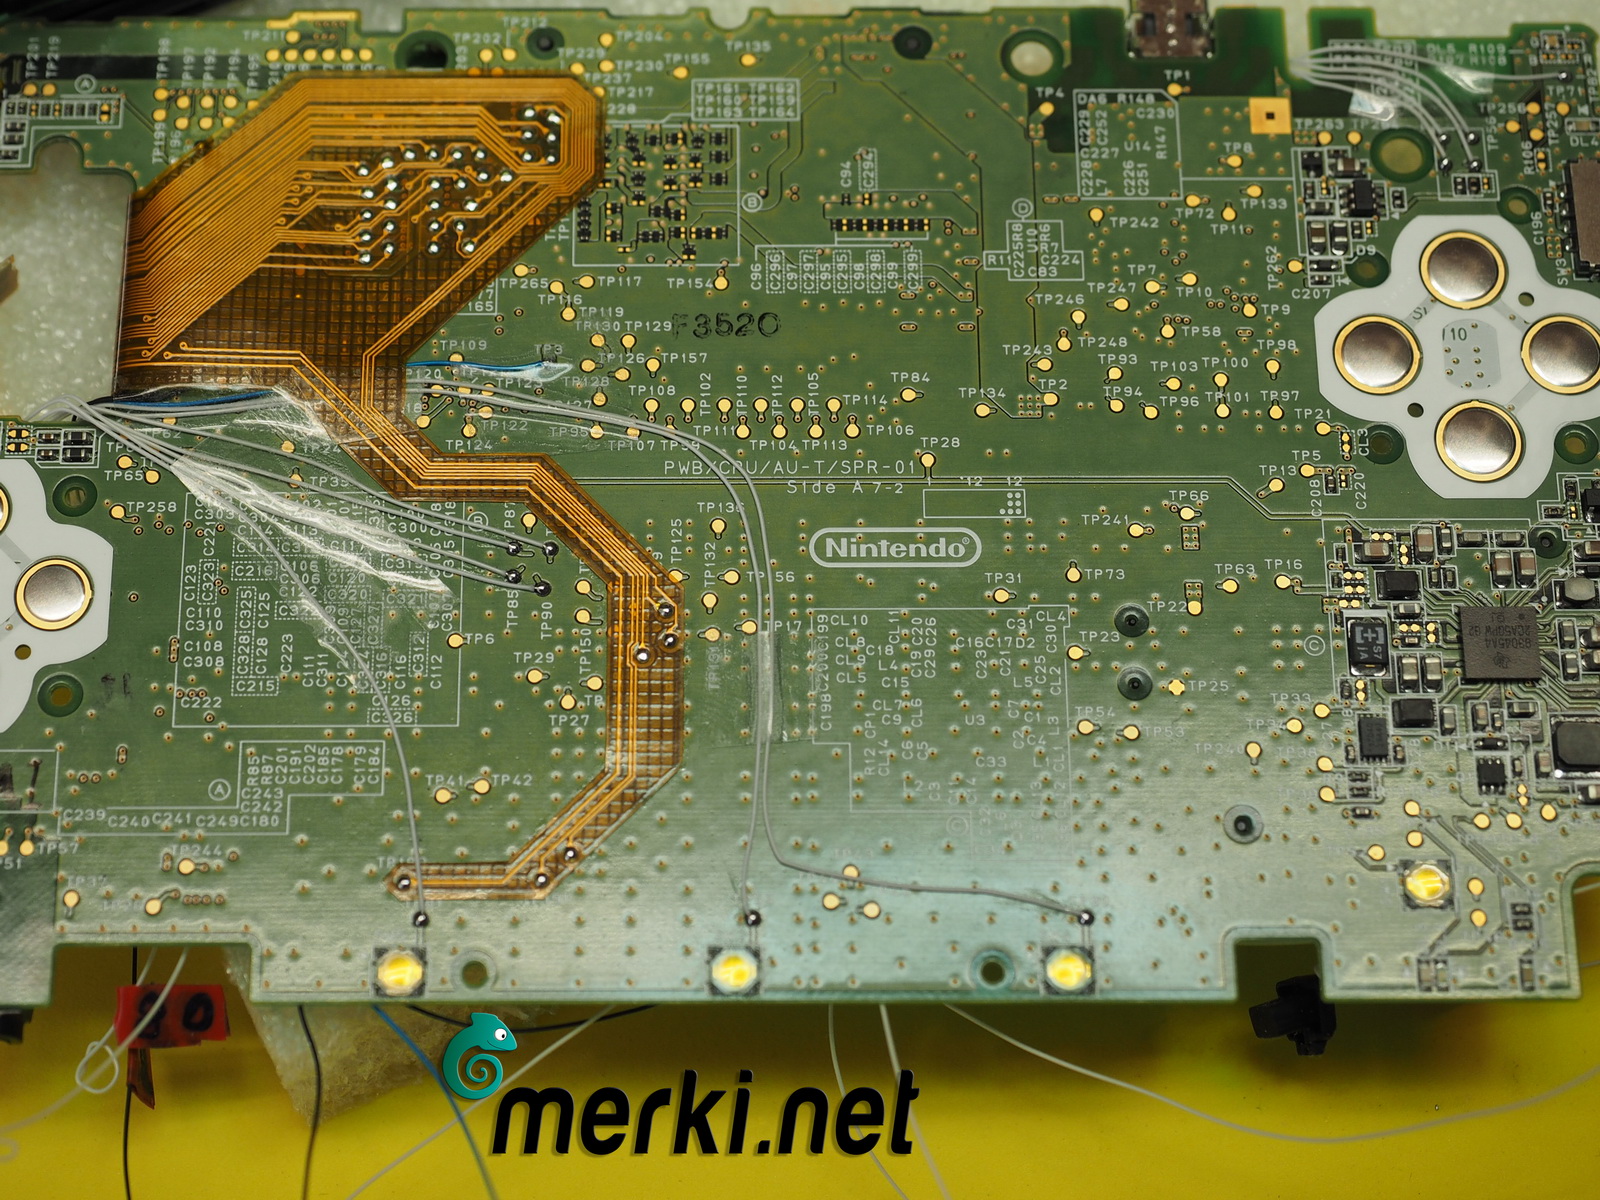

3DS Controller Mod
Was ist ein 3DS Controller Mod?
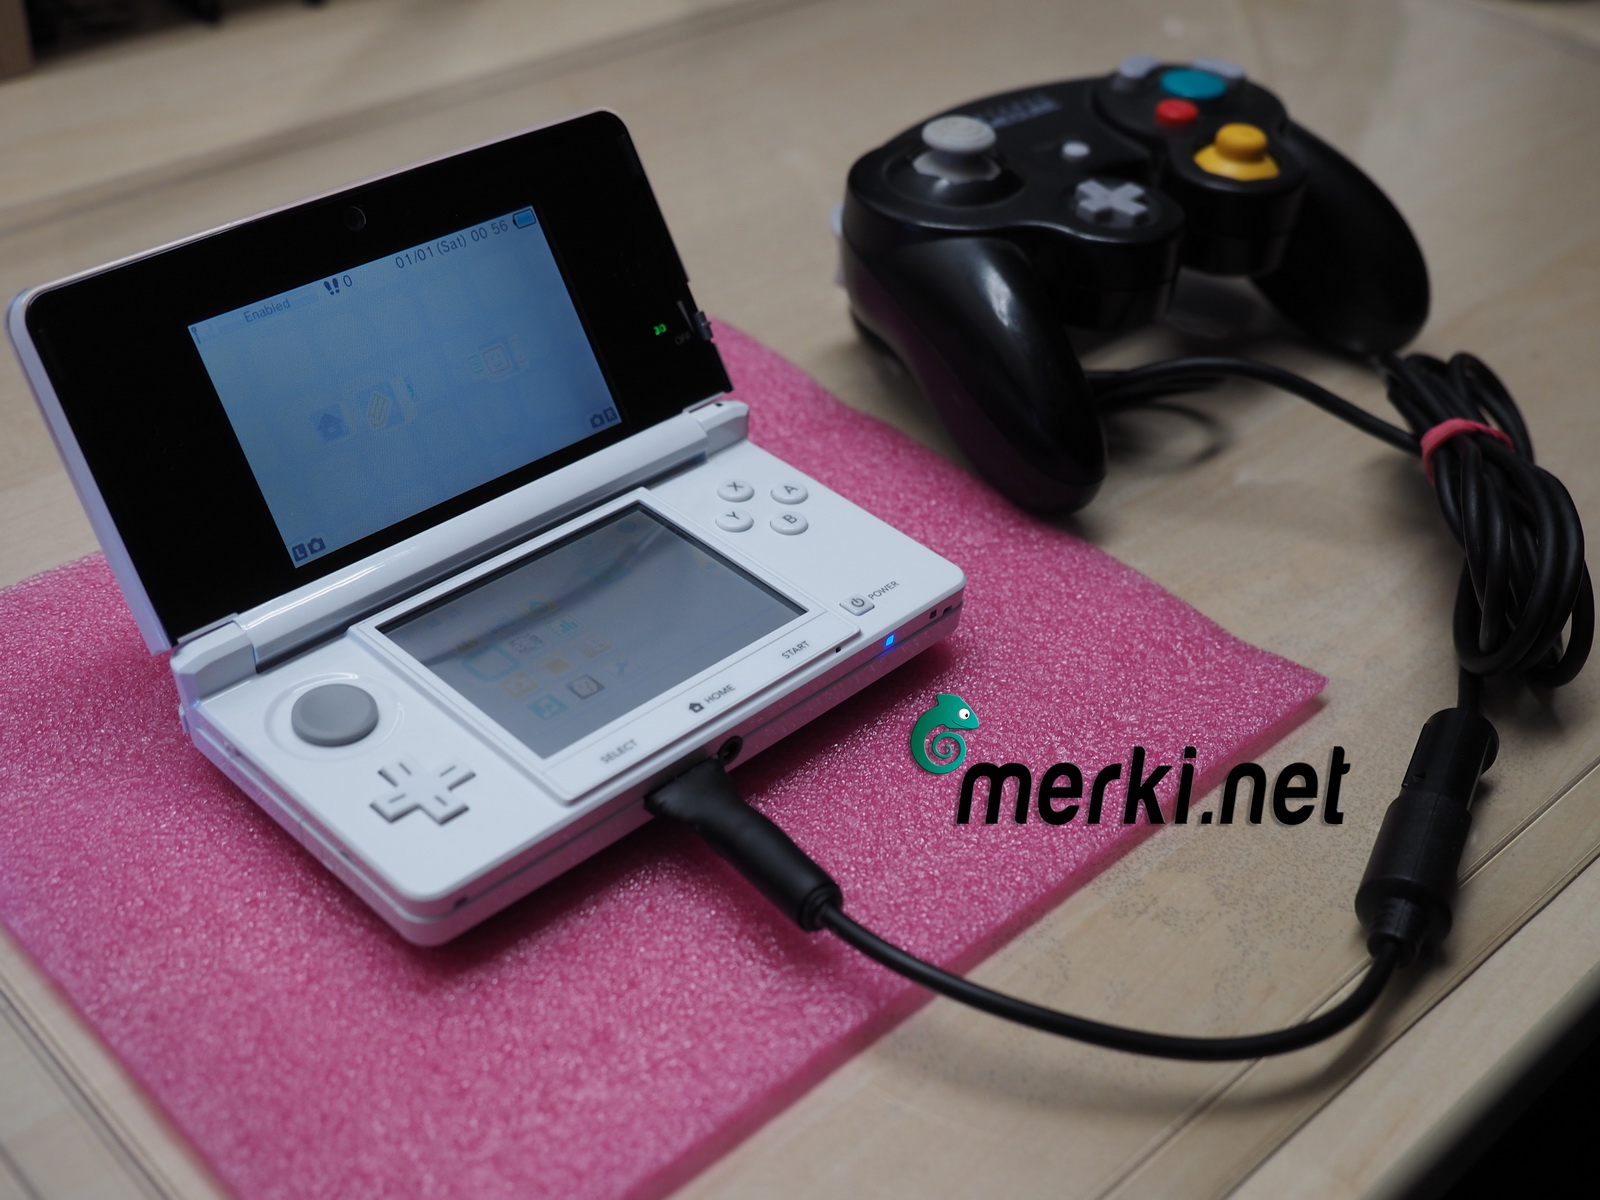
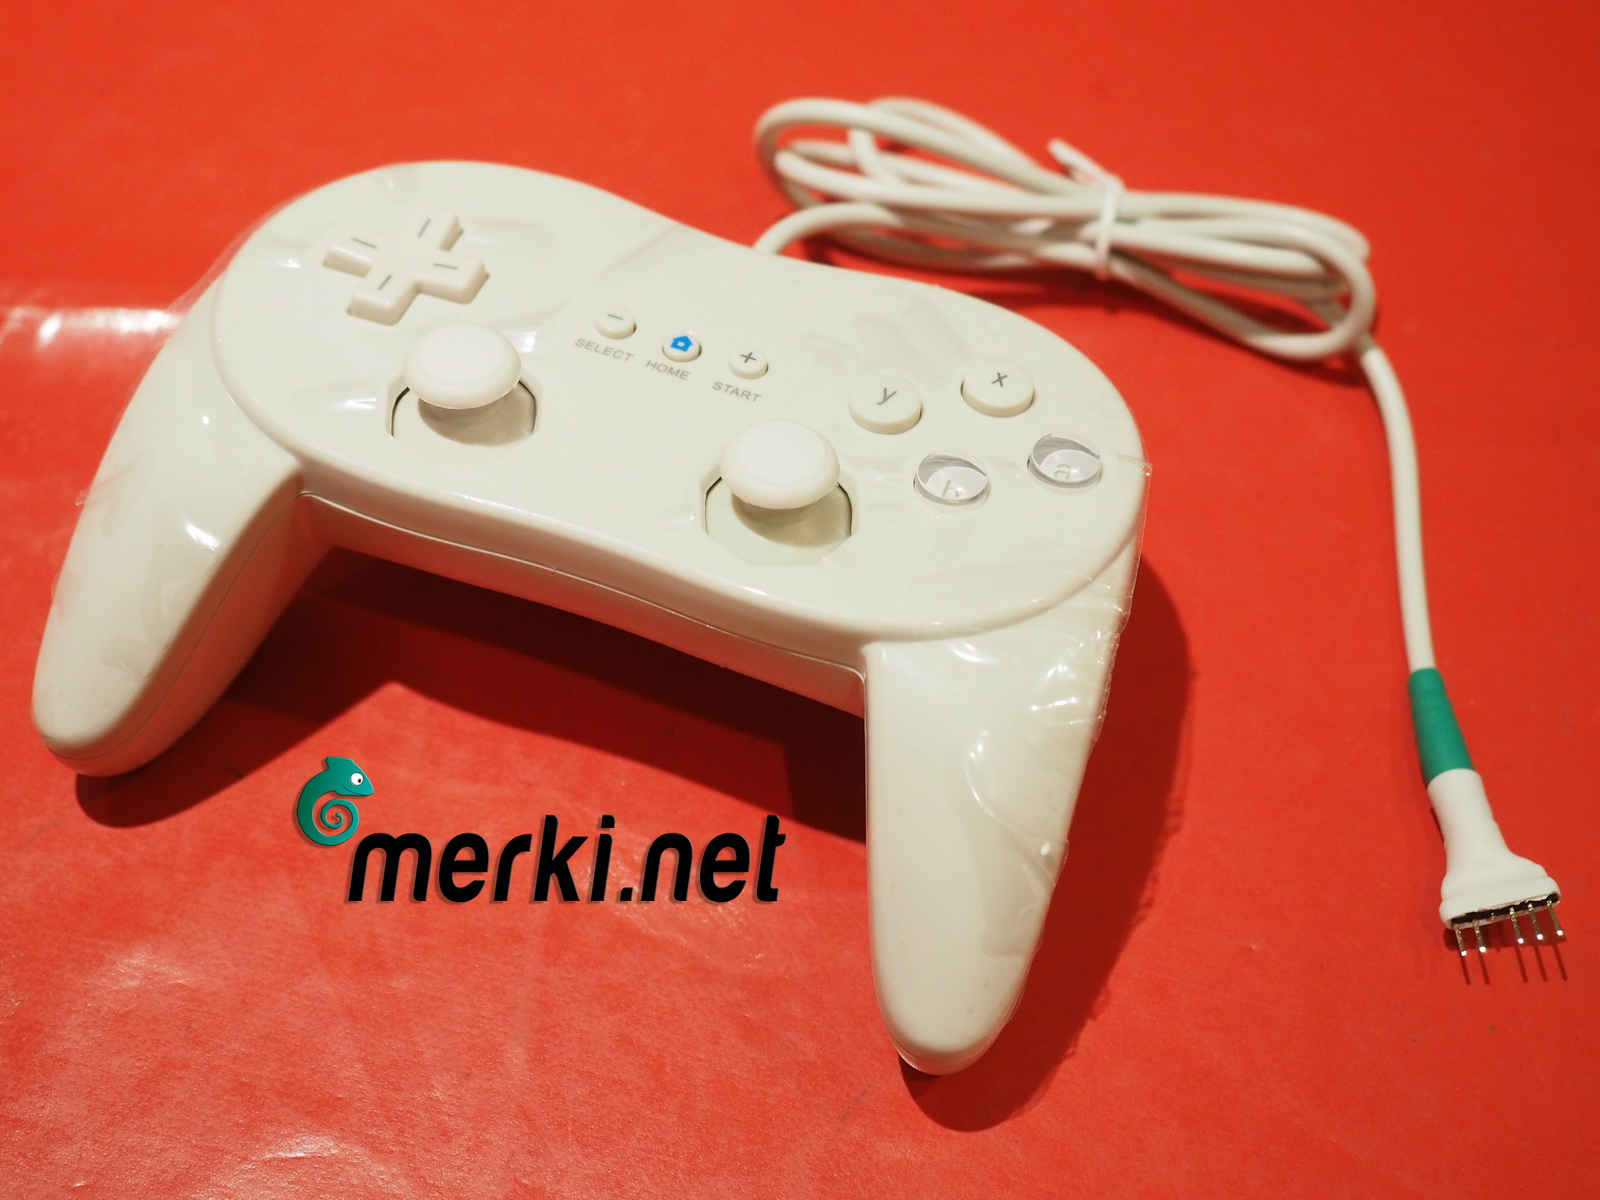
Der Controller Mod ermöglicht es DS/3DS Spiele mit einem externen Controller wie dem Gamecube, Wii-Classic oder Playstation Controller steuern zu können.
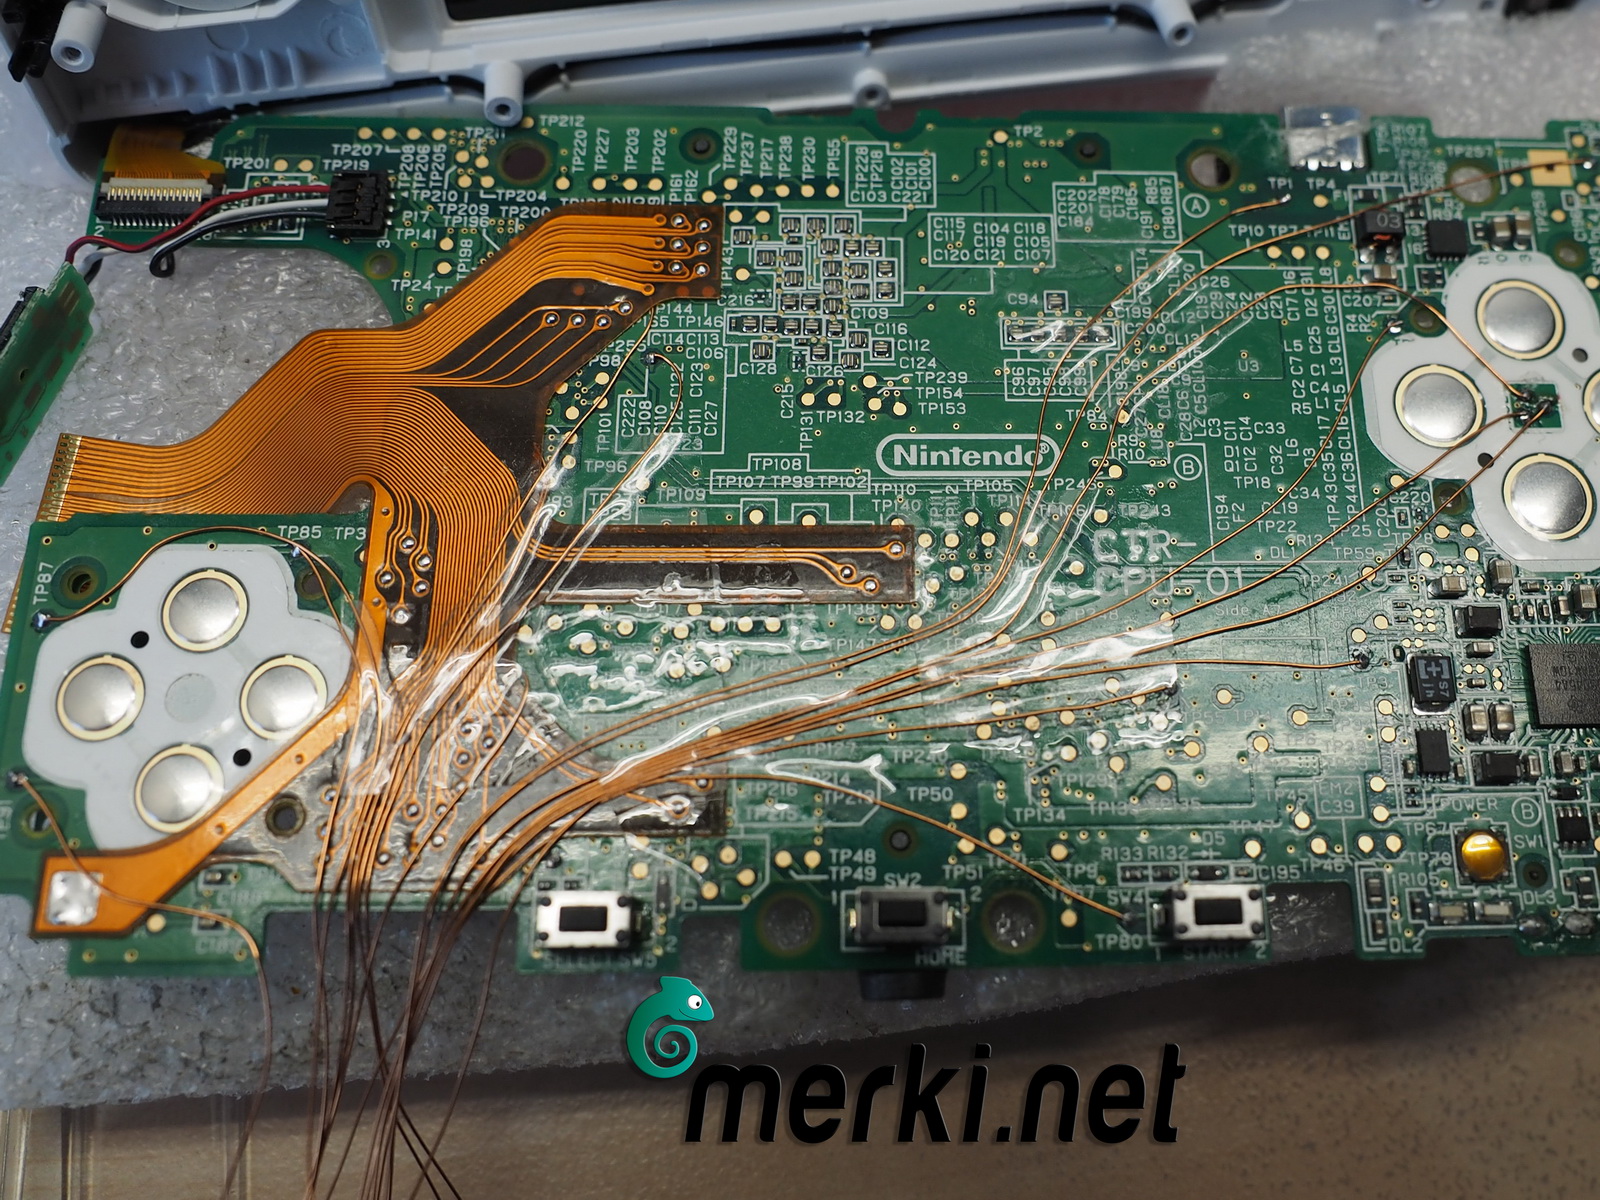
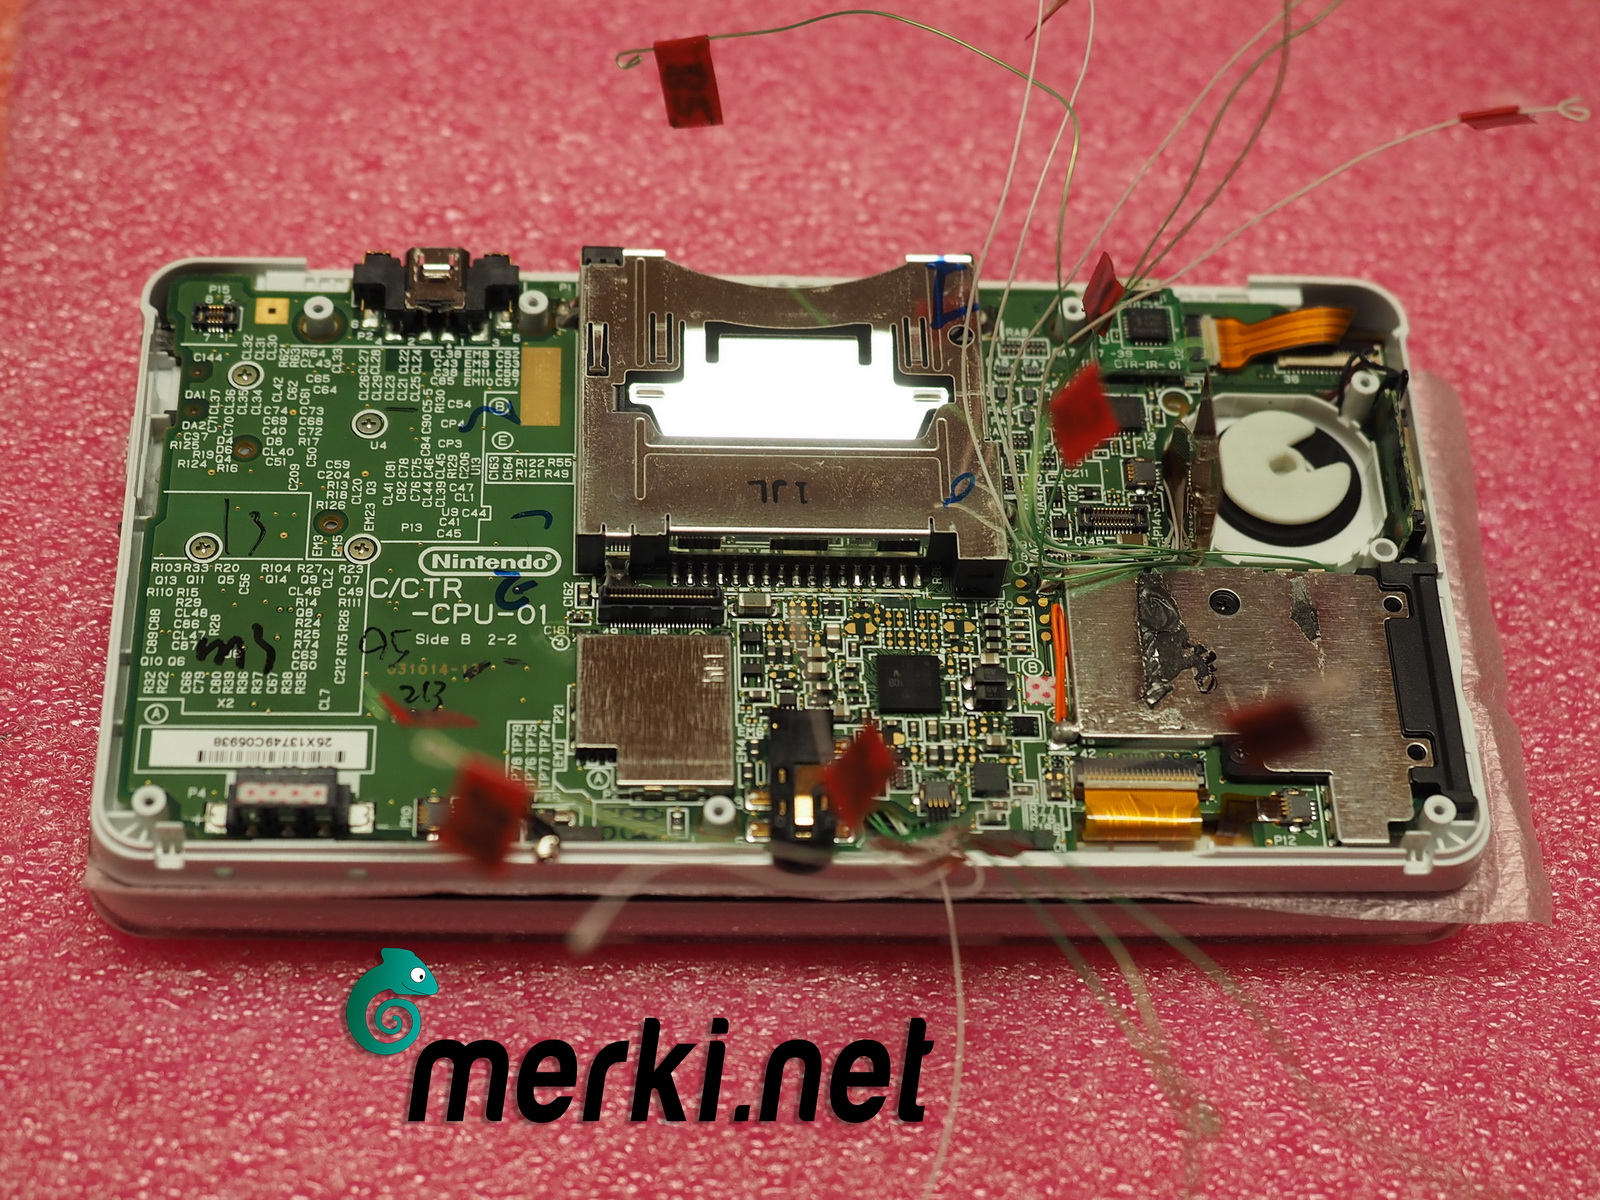
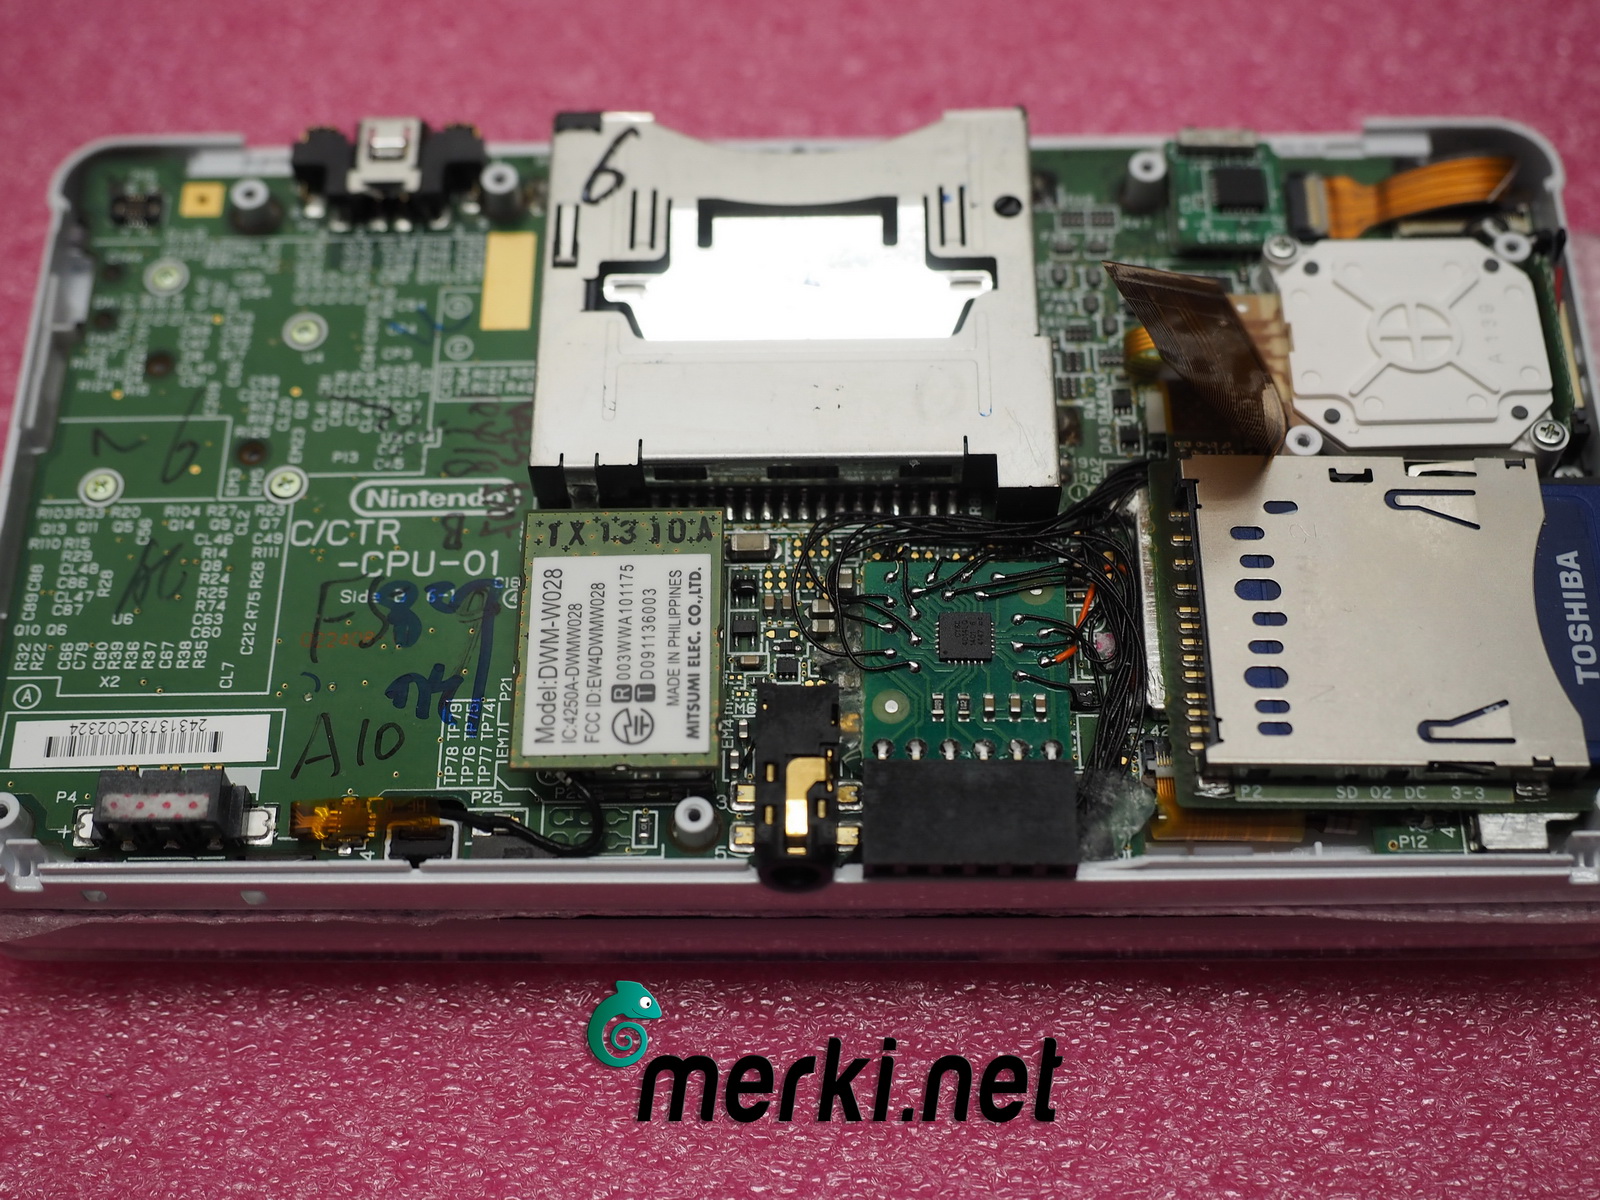
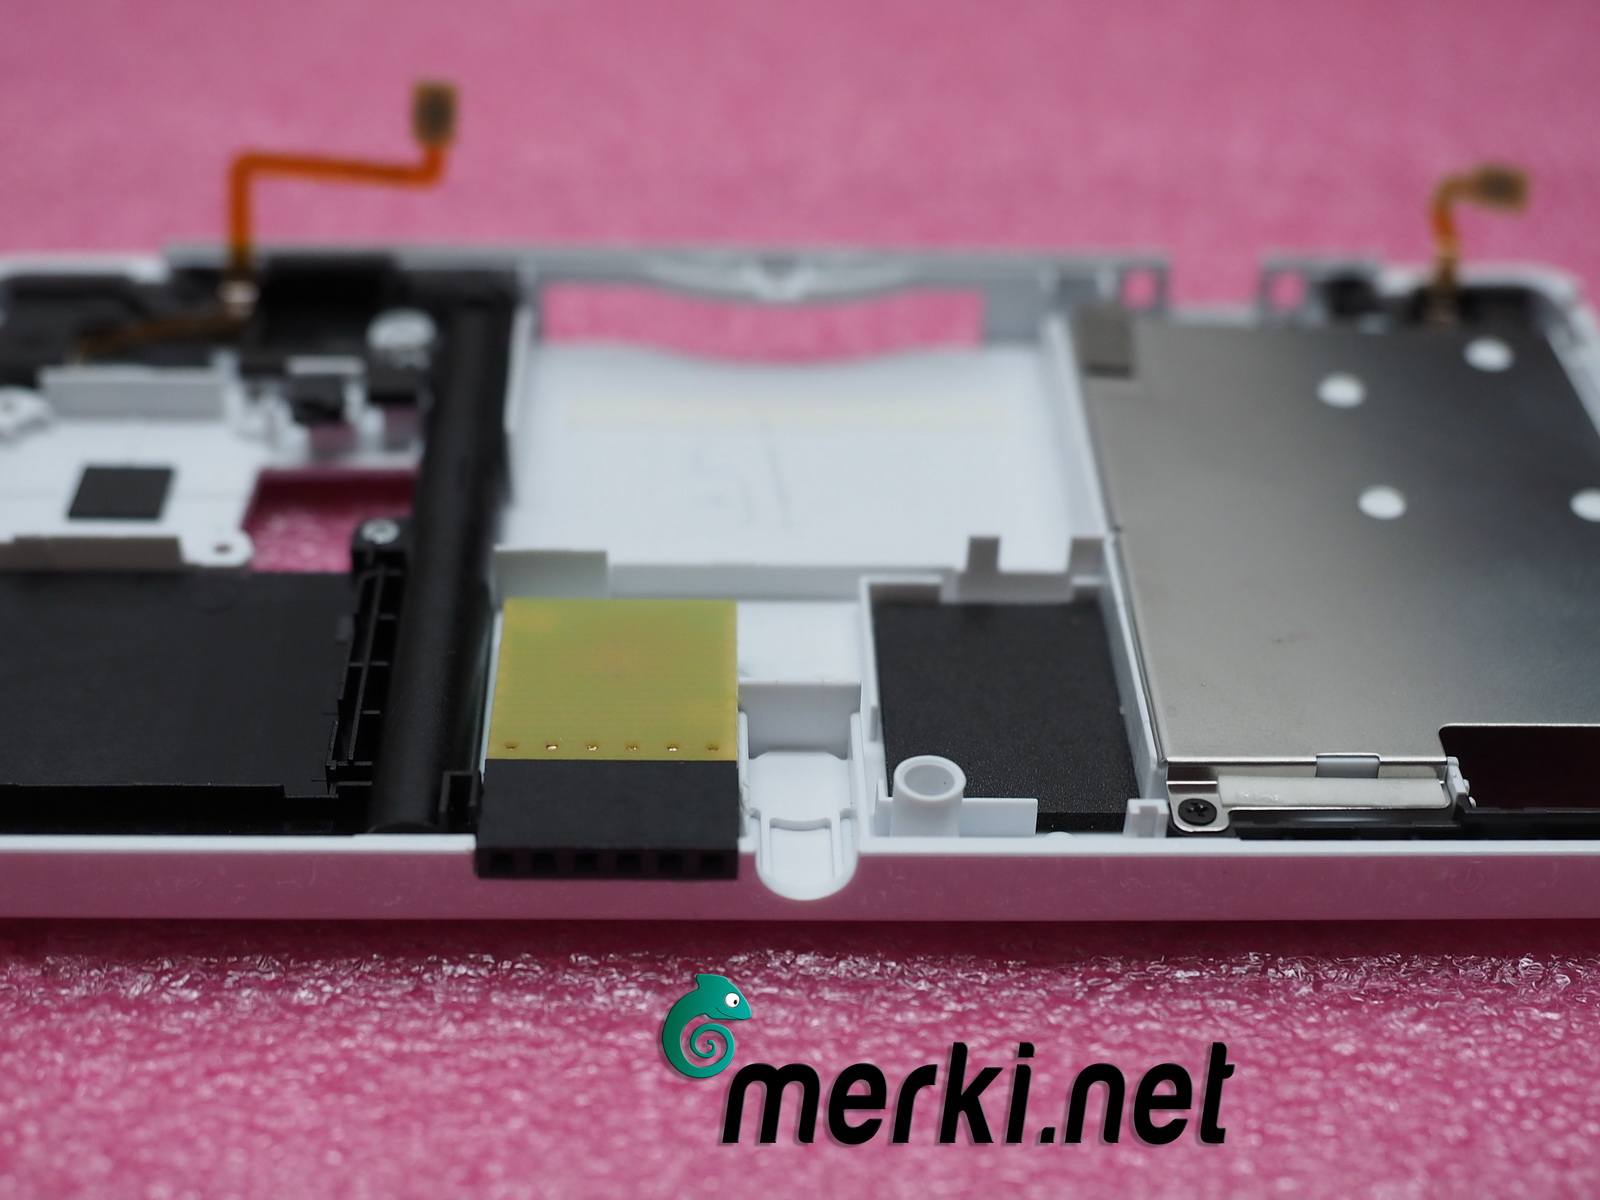
Der Chip, der diese Features an einer 3DS Konsle ermöglicht, wurde von Neal Tew aus den USA entwickelt.
An der Konsolen-Firmware/Software wird nichts verändert, die gesammte Programmierung steckt nur in der Platine mit dem Chip.
Die einzige Voraussetzung für einen Einbau des 3DS Contoller Mod ist, dass nur die „old“ Modelle unterstützt werden:
Nintendo (old) 3DS
Nintendo (old) 3DS XL
Nintendo (old) 2DS
Auf den NEW Modellen funktioniert dieser Mod leider nicht richtig.
Der 3DS Controller Mod hat außerdem eine mapping Funktion, die es möglich macht, zum Teil Tasten selbst zu belegen oder auch vorgefertigte Einstellungen zu übernehmen, die z.B. Combos mit einem Tastdruck ermöglichen.
Mehr zu den Einstellungsmöglichkeiten steht hier im Anschluss...
Neal Tew's 3DS Controller Mod Mapping-Anleitung :
* The manual for older controller mods (sold before May 2017) is at the other tab
* R2, L2 in the documentation refers to secondary L/R buttons (Z on GameCube, ZL/ZR on Wii, R1/L1 on PlayStation).
Secondary analog stick
----------------------
There are 4 modes for the second analog stick:
Smash Bros.
-----------
The second analog stick is used for smash and ariel attacks (direction+A) in Super Smash Bros.
The R2 button (i.e. GameCube Z) is mapped to 3DS L.
Hold Z with C-stick for Smash charging (Melee-style controls).
Button mapping
--------------
The analog stick can be mapped to digital controls (A/B/X/Y by default)
Circle Pad (shared)
------------
Both analog sticks control the 3DS circle pad.
Circle Pad Pro
--------------
The Circle Pad Pro accessory is emulated. Circle Pad Pro mode is automatically selected when activity on the IR port is detected.
In Circle Pad Pro mode, button mapping is also changed:
controller L -> CPP ZL
controller R -> CPP ZR
controller L2 -> 3DS L
controller R2 -> CPP R
Default button mapping
-----------------------
GameCube:
Z+Start = Select
L+R+Z+Start = Home
PlayStation:
L+R+Start+Select = Home
N64:
L or Z = L
C-buttons = A,B,X,Y
L+Start = Select
L+R+Z+start = Home
SNES:
L+R+Start+Select = Home
Wii Classic:
(1:1 mapping)
Settings
--------------
Separate settings are maintained for each controller type.
Button mapping, calibration, and other settings are not made permanent until saved.
Unplug a controller or turn off the 3DS to revert unsaved settings.
To remove all saved settings and restore factory defaults, hold Start+Select on the 3DS while powering on.
** Button combinations are pushed on the controller, not 3DS. Up/Down/Left/Right refer to the D-pad, not analog stick.
L + R + Start + A (hold 2 seconds): Save settings
L + R + Left + Start: Second analog stick in Smash Bros. mode
L + R + Up + Start: Second analog stick in circle pad (shared) mode
L + R + Right + Start: Second analog stick in button mapping mode
L + R + Down + Start: Disable Circle Pad Pro emulation
Left + Start (hold 2 seconds): Set L button analog trigger level (GameCube only)
Right + Start (hold 2 seconds): Set R button analog trigger level (GameCube only)
Digital-only controllers (SNES and PlayStation):
L + R + Up + Start: Map D-pad to 3DS circle pad
L + R + Down + Start: Map D-pad to 3DS D-pad
Button mapping
-----------------
Button remapping will be easier if you go to a screen where buttons have no effect (like the 3DS Other Settings screen).
Push L+R+B+Start to enter button remapping mode. Push Start to leave remapping mode.
Hold a button on the 3DS and push the corresponding button on the controller.
To "unmap" a button, push the 3DS button by itself.
You can map multiple controller buttons to a single 3DS button. There are two types, "OR"-mapping or "AND"-mapping.
OR-map: Either controller button can trigger a button push on the 3DS (for example, both L and Z on the N64 go to 3DS L.) For OR-mapping, hold the 3DS button, then push each controller button one at a time.
AND-map: All buttons must be held to trigger a button push (for example, Z+Start on GameCube for Select). For AND-mapping, hold the 3DS button and push all controller buttons together.
** On an N64 controller, L+R+Start triggers a self-calibrate function on the controller. The analog stick should be in neutral position when using this button combination.
To map L2/R2 buttons (for CPP or Smash):
L2: Hold 3DS L+Up
R2: Hold 3DS R+X
Calibration
------------
If analog sticks need to be recalibrated: Go to the 3DS calibration screen. Unplug the controller and go through the normal calibration routine, using the 3DS's circle pad. Once you're at the test screen (where you highlight the test arrows green), connect your controller.
L + R + X + Start: Set analog stick center position
Hold L + R + analog stick direction, then push D-pad direction to adjust scaling. Position the cursor just past the tip of the arrows.
Save calibration by holding L+R+Start+A (see Settings, above).
* R2, L2 in the documentation refers to secondary L/R buttons (Z on GameCube, ZL/ZR on Wii, R1/L1 on PlayStation).
Circle Pad Pro
---------------
The adapter emulates a Circle Pad Pro, using your controller's secondary analog stick. CPP emulation is disabled while a controller is unplugged.
While the CPP is active, button mapping is also changed:
controller L -> CPP ZL
controller R -> CPP ZR
controller L2 -> 3DS L
controller R2 -> CPP R
Smash Bros.
-----------
The second analog stick is used for smash and ariel attacks (direction+A) in Super Smash Bros.
The R2 button (i.e. GameCube Z) is mapped to 3DS L.
Hold Z with C-stick for Smash charging (Melee-style controls).
Default button mapping
-----------------------
GameCube:
Z+Start = Select
L+R+Z+Start = Home
PlayStation:
L+R+Start+Select = Home
N64:
L or Z = L
C-buttons = A,B,X,Y
L+Start = Select
L+R+Z+start = Home
SNES:
L+R+Start+Select = Home
Wii Classic:
(1:1 mapping)
Settings
--------------
Separate settings are maintained for each controller type.
Button remapping, calibration, and other settings are not made permanent until saved.
Unplug a controller or turn off the 3DS to revert to previous settings.
To remove all saved settings and revert to factory defaults, hold Start+Select on the 3DS while powering on.
** Up/Down/Left/Right are on the D-pad, not analog stick.
L + R + Start + A (hold 2 seconds): Save settings
L + R + Up + Start: Enable second analog stick
L + R + Down + Start: Disable second analog stick
L + R + Right + Start: Swap analog sticks
L + R + Left + Start: No analog stick swap
Left + Start (hold 2 seconds): Set L button analog trigger level (GameCube only)
Right + Start (hold 2 seconds): Set R button analog trigger level (GameCube only)
Digital-only controllers (SNES and PlayStation):
L + R + Up + Start: Map D-pad to 3DS circle pad
L + R + Down + Start: Map D-pad to 3DS D-pad
Button mapping
-----------------
Button remapping will be easier if you go to a screen where buttons have no effect (like the 3DS Other Settings screen).
Push L+R+B+Start to enter button remapping mode. Push Start to leave remapping mode.
Hold a button on the 3DS and push the corresponding button on the controller.
To "unmap" a button, push the 3DS button by itself.
You can map multiple controller buttons to a single 3DS button. There are two types, "OR"-mapping or "AND"-mapping.
OR-map: Either controller button can trigger a button push on the 3DS (for example, both L and Z on the N64 go to 3DS L.) For OR-mapping, hold the 3DS button, then push each controller button one at a time.
AND-map: All buttons must be held to trigger a button push (for example, Z+Start on GameCube for Select). For AND-mapping, hold the 3DS button and push all controller buttons together.
** On an N64 controller, L+R+Start triggers a self-calibrate function on the controller. The analog stick should be in neutral position when using this button combination.
To map L2/R2 buttons (for CPP or Smash):
L2: Hold 3DS L+Up
R2: Hold 3DS R+X
Calibration
------------
If analog sticks need to be recalibrated: Go to the 3DS calibration screen. Unplug the controller and go through the normal calibration routine, using the 3DS's circle pad. Once you're at the test screen (where you highlight the test arrows green), connect your controller.
L + R + X + Start: Set analog stick center position
Hold L + R + analog stick direction, then push D-pad direction to adjust scaling. Position the cursor just past the tip of the arrows.
Save calibration by holding L+R+Start+A (see Settings, above).
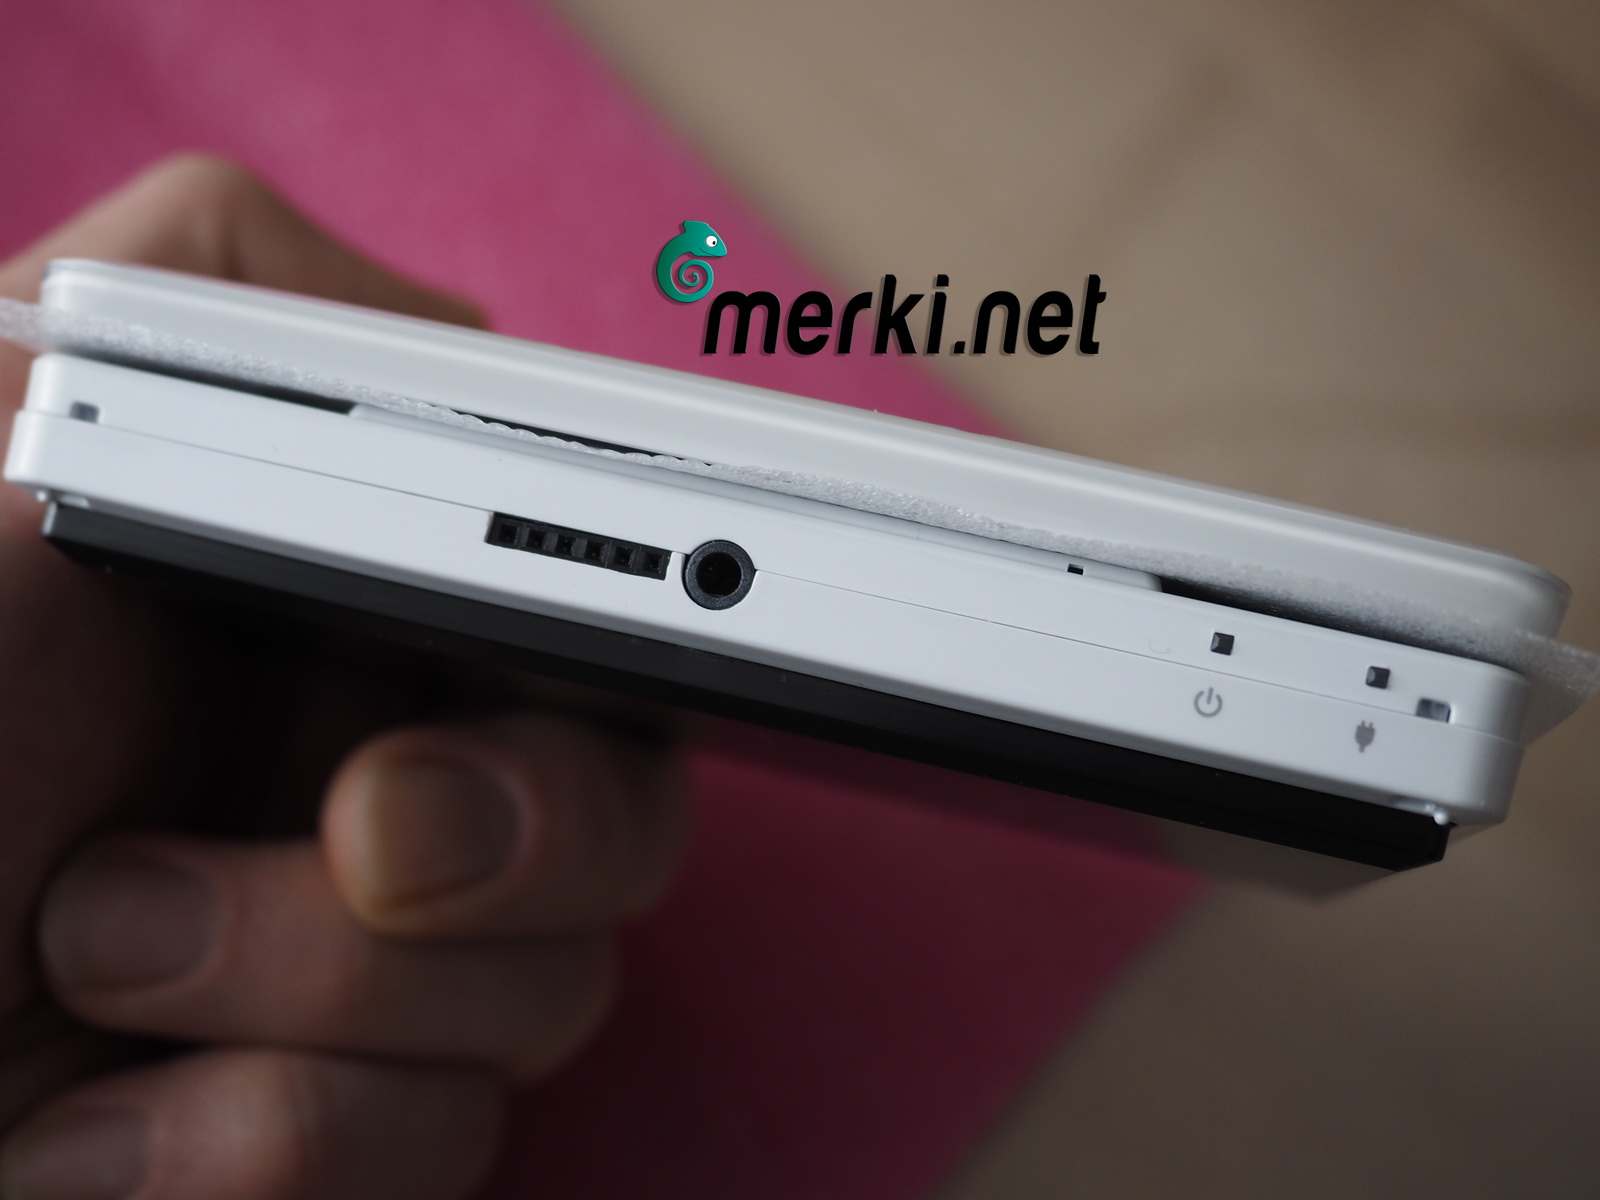
Hier ist unsere 3DS Controller Mod Galerie!
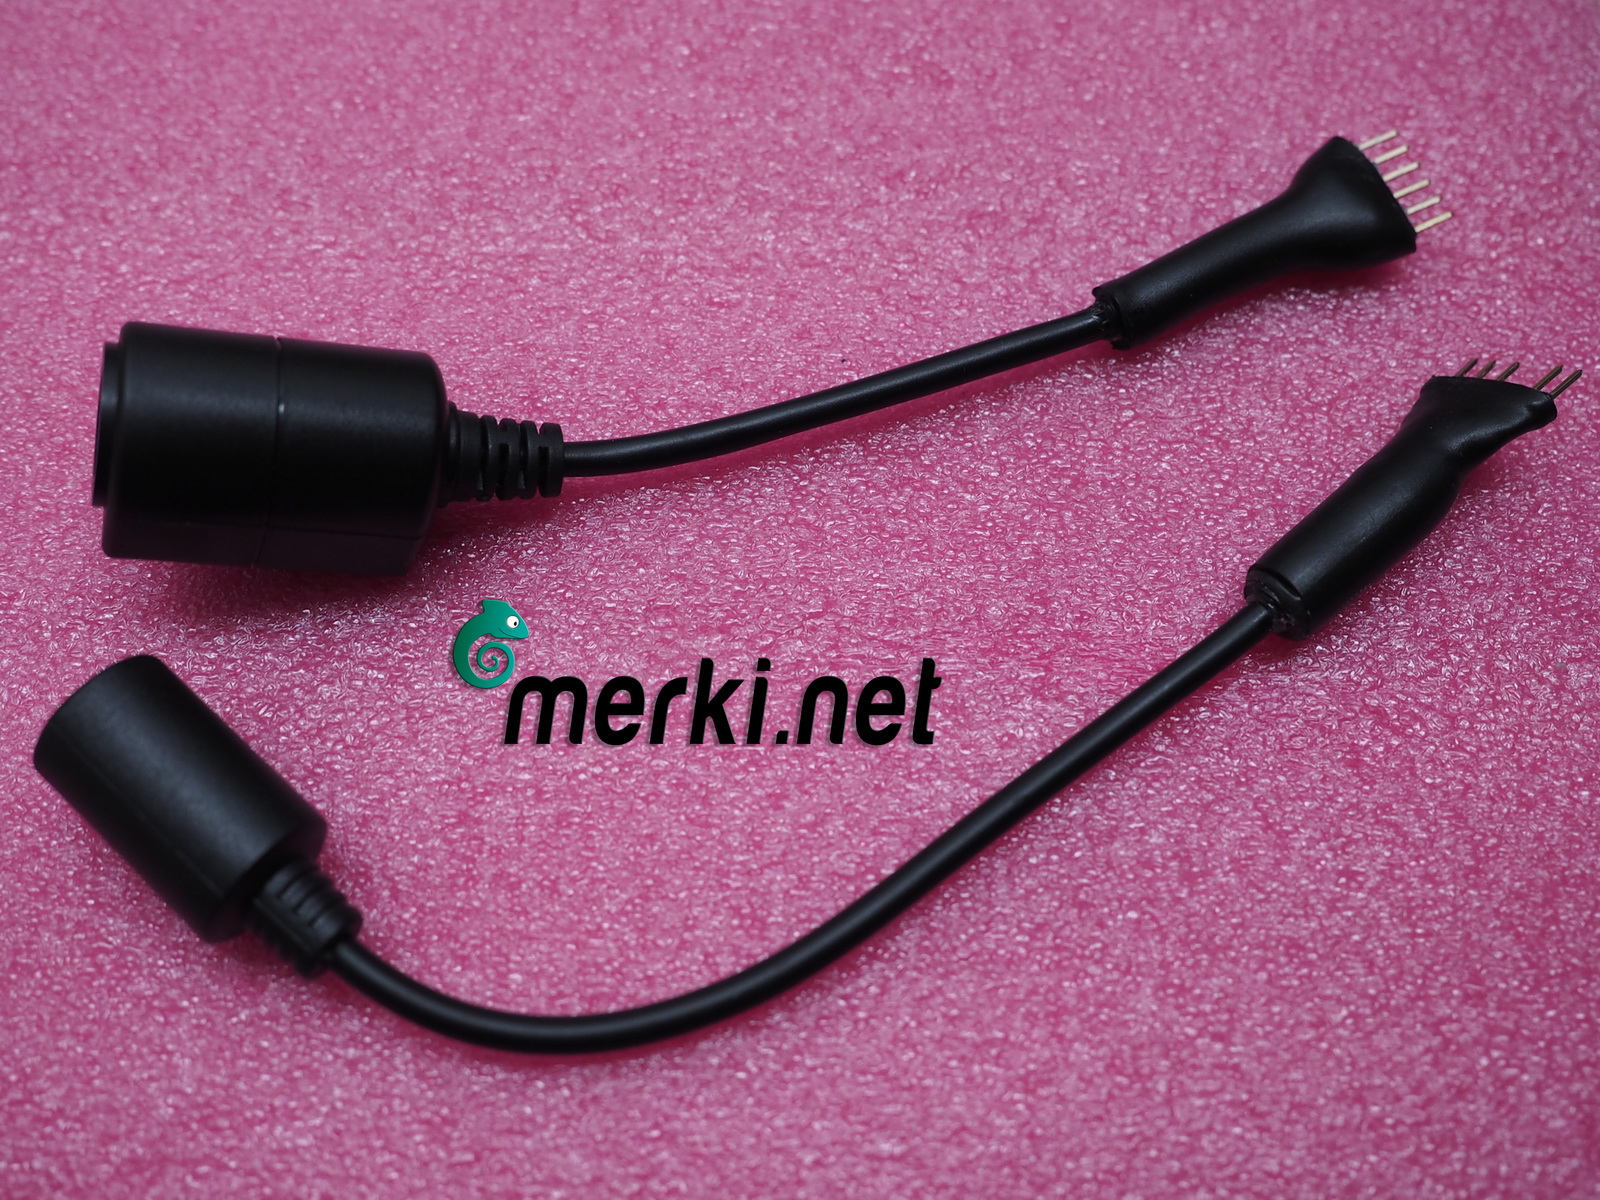
Eine Installation dauert in etwa 4 Stunden für den Chip und die notwendigen Verbindungen. Hinzu kommt noch etwa 30 Minuten für den Adapter für den Game Controller.